U-shaped joist hangers are a standard item on most framing jobs, but installing them accurately, with the right height and spacing, can be tedious and time-consuming. Can anyone suggest a jig, a fixture, a clamp or a technique that would make the job faster and easier?
Donald Matthews, Coeur d’Alene, ID
Fred Misner of Edmonds, Washington, replies: Because I usually work alone, I developed the following method of installing joist hangers. I nail the hanger flush with, or a little back from, the end of the joist. This ensures a tight fit (otherwise the hanger could hold the joist away from the beam). Next I clamp a short 1×2 or 2×2 stick to the top of the joist with about 1 in. extending past the joist end, using a sliding bar clamp or pipe clamp. Then I set the joist in place with the extending stick resting on top of the beam—this automatically lines up the top edges. Next I hammer home the two barbs on the hanger. When nailing off the hanger to the beam, I angle the nails in opposing directions to reduce the pullout potential.
If a clamp isn’t available or if you prefer a low-tech method, nail the hanger on the joist end, then line things up to your liking and use the barbs on the hangers to rough set the joist. Finetune, if necessary, by adjusting the hanger with your hammer until it’s in place, then nail it off to the beam.
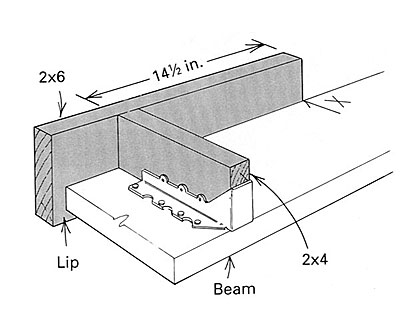
Todd Sauls of Santa Barbara, California, replies: In most cases I attach joist hangers to the beam before installing it. This eliminates the hassle of trying to nail from a ladder or bending over and working from above. First make a T-shaped jig out of scrap pieces of 2×6 and 2×4 (see drawing below). The length of the 2×4 should equal the width of the joists. Nail the scraps together with one edge flush, which leaves a lip on the back where the 2×6 overhangs the 2×4. You can lay out spacing for joist hangers, or you can cut the 2×6 long enough to serve as a layout tool. Hook the lip over the top of the beam, slip the joist hanger over the 2×4 and nail it off.

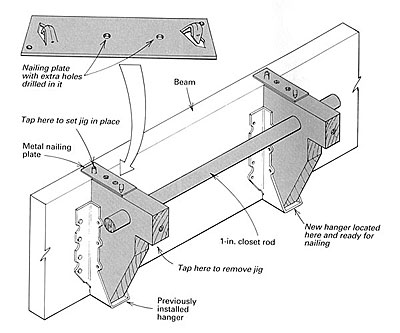
Fred Mocking of Skokie, Illinois, replies: The drawing below shows a jig that I use to lay out and install joist hangers. It’s made with scraps of joist stock and a length of 1-in. closet rod. On top of each block I install a 4-in. metal nailing plate with barbs on each end—the kind used to protect plumbing runs from nails. I screw the plate to the block, with the plate overhanging the block about 3/4 in.
You have to install the first hanger without the jig. Then you slip the next hanger over one block and insert the other block in the first hanger. Tapping the barbs into the jim joist or beam will hold the jig in place while you install the hanger. To remove the jig, tap up on the block.

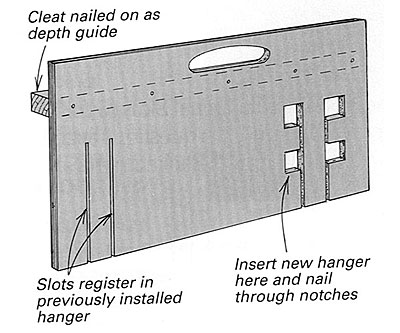
Steve Chassereau of Portland, Oregon, replies: Here’s a jig that not only aids in the installation of joist hangers but also spaces them the correct distance apart. To make the jig, use a 2-ft. scrap of plywood 10 in. or 12 in. wide. In one end of the plywood cut two slots that will register in a previously installed joist hanger (see drawing below). Measure for the on-center spacing of the joists and cut another pair of slots. Slide a joist hanger into these slots, mark where nails will go and cut notches around the nail locations. On the back of this plywood jig, nail a cleat spaced up from the bottom edge a distance equal to the width of the joists. This will act as a depth guide. You can even cut a hole in the plywood to serve as a handle.
To use the jig, insert a joist hanger into the second set of slots—spring tension should hold it in place—slide the first set of slots over the previously installed joist hanger and rest the depth guide on the rim joist or beam. Then, nail the new joist hanger in place.

Chris Cartwright of Middlebury, Vermont, replies: Because joists can vary in width as much as 1/4 in., installing joist hangers before installing joists won’t always result in precise framing. I’ve found the best technique is to toenail the joist in place first, then install the joist hangers.
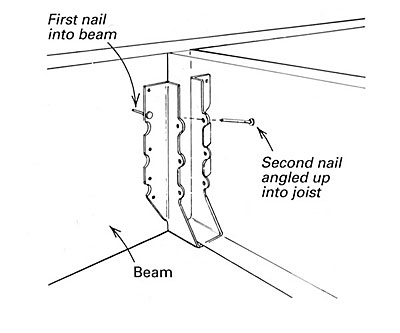
Snug joist-hanger installation is accomplished by nailing the hanger to the beam first and then securing the hanger to the joist with a second nail (see drawing below). Angle the second nail up so that when it is driven home, the joist hanger is drawn up tight against the bottom of the joist. This done, the joist hanger can be nailed up the rest of the way. And yes, all the holes should get a nail. The load-bearing capability of the joist hanger is calculated on the basis of a full complement of approved joist-hanger nails working to resist shear.

Sign up for eletters today and get the latest how-to from Fine Homebuilding, plus special offers.